For this tutorial you will need a working knowledge of PSP. I use PSP 9.
Supplies: I have used a paper from Monica's Happy New Year Party, the kit can be found here
Thank you for so many wonderful shares! The bow and hearts I have saved in an extra's folder collected over the years.
If you recognise them please let me know and I will give credit to you.
Tube of Choice: I am using a beautiful tube by Jennifer Janesko which you will need a licence to use. Her tubes are sold at CILM
Mask of Choice: I am using one of the fantastic masks from Zuzzana, zuzzanna_mask60.
You can get her masks here Thank you for sharing your talent with us!
Fonts of Choice: Lucida Calligraphy, Reisling and Pixelette
Now before we start remember that this tut is only a guide, your imagination and talent will make this tag your own!
Open a New Layer 600x600 white or depending on your forum you may choose to make it black and we will resize later.
Either open a new layer and use a colour of your choice or use a paper and copy and paste that as a new layer.
Go to Layers-Load/Save Mask-load mask from disk, choose your mask or use zuzzana_mask60.
Source luminance-fit to canvas-invert transparency ticked-hide all mask-then load. Back to layers-merge-merge group.
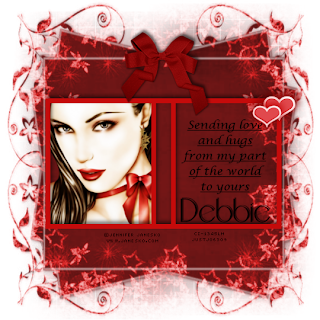
Go to your rectangle tool and up the top where it says Mode click on the square-width 10 and draw a square big enough to fit
a tube on one side and because we are going to duplicate it, a message and name on the other side. Convert to a raster layer and
add a drop shadow -4 2 55 10 black now duplicate and then mirror it. See my tag for reference. Merge down and the boxes will now
be merged as one layer. Go to your tube and either resize it now or paste as a new layer and resize it to fit on one
side of the box, use your magic wand to click inside the box, go to selections-modify-expand by about 4-invert and then hit delete
and make sure you are on the tube layer when you do this. Move your tube below the box layer. I've added a bow and a couple of
hearts but you can add any little extras you like.
I like to resize my tag now before I add any writing or copyrights. I've made my tag 540x540 or leave it as is.
For the message I've used Lucida Calligraphy size 14 underlined in black. You can use the message I have or use your own.
For the name I've used Reisling, size 48 dropshadow -2 2 60 black and dedicated it to my very dear friend Debbie.
Copyrights are written in Pixelette size 6 stroke 0 anti-alias off.
Now you can save your tag as a PNG (x out background first then save for forums) or JPEG.
Thank you for trying out my very first tut any similiarities to any other tuts is by coincidence only or great minds think alike..lol
If you'd like to show off your tag email me cutiepie_2468@hotmail.com I'd love to see what you've created.
Written and created by JustJo63 25/26th March 2009


No comments:
Post a Comment