For this tutorial you will need a working knowledge of PSP. I use PSP 9.
Supplies: Scrapkit is called Blissfull Colors from Scrap Dimensions, ty Doris, just gorgeous!! The kit can be found-here
Tube of Choice: I am using a beautiful tube by Barbara Jensen which you will need a licence to use. Her tubes are sold here
Mask of Choice: I am using one of the fantastic masks from Zuzzana, zuzzanna blind mask.
You can get her masks here
Thank you for sharing your talent with us!
Tag Template #3 by Cinnamon Scraps, which you can find here What great templates, ty!!
Fonts of Choice:Segoe Script and Pixelette
Now before we start remember that this tut is only a guide, your imagination and talent will make this tag your own!
Tag 1~this will be used to put into the template, so here we will make something pretty and fun!
Open a New Layer 650x650 background white and we will be resizing it before we use it on the template.
Either open a new layer and use a colour of your choice or use a paper and copy and paste that as a new layer.
Go to Layers-Load/Save Mask-load mask from disk, choose your mask or use zuzzana blind mask.
Source luminance-fit to canvas-invert transparency unticked-hide all mask-then load. Back to layers-merge-merge group.
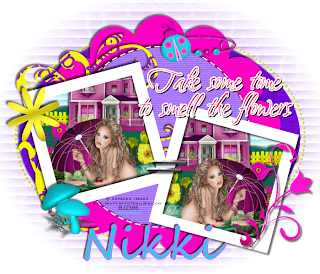
Now have some fun and make a scene, filling it with grass, flowers, the house and ofcourse your tube. Look at
my finished tag as a guide.
I resized the finished tag to about 400x400 you can make it smaller if you wish. Save your tag so it doesn't get lost
if your PSP shuts down..we all know this has happened to many of us!!
Tag 2~Open your template and delete the copyright layer. Resize the background layer to whatever size you wish and copy and paste paper 1 and use your deform tool to make it fit the whole tag. I used zuzzana's blind mask and repeat the same as the first tag.
The best way to to fill each layer with the papers of your choice is to copy and paste them, use the deform tool if they're not quite big enough for the layer, then go to Selections-select all-float-defloat-invert-delete. This gives a smoother edge.
On the left frame and right frame backgrounds, use your wand, click inside each one, one at a time and paste the tag we made earlier, mirroring it for the right frame and each time invert, delete. Place these under the left and right frames, which I left white.
I left the wordart as is, you may choose to change the colour etc.
Add any elements from the scrapkit, there are so many to choose from!
I know the next step everyone can do differently but I go back through each layer and delete the originals, leaving the paper layer and then add dropshadows, mine vary. The only layers I don't delete are the right and left frames and right and left background frames. Add dropshadows of choice to them too.
Now resize the tag if you wish and then add copyrights. Copyrights are written in Pixelette size 6 stroke 0 anti-alias off.
For the name I've used Segoe Script, size 72 dropshadow -3 -3 60 black and dedicated it to my very dear friend Nikki.
Add your name and save as a png or jpeg. For forums I like to either change the background to black or x out the background and then save as a png.
Thank you for trying out my second tut any similiarities to any other tuts is by coincidence only or great minds think alike..lol
If you'd like to show off your tag email me cutiepie_2468@hotmail.com I'd love to see what you've created.
Written and created by JustJo63 28/29th March 2009


No comments:
Post a Comment